Oshawatt


Hello friend of Oshawatt!

Oshawatt is a cute open source robot. It's designed to look like a sloth with its extremely long arms, but still have the charm of the Pokemon Oshawot! Lots of degrees of freedom in its arms to display lots of waving motions, act goofy, an expressive mouth that can be like a cylon, or happy/sad/surprised, and also have mini-fangs!

It also has swinging immobile legs, so it can look like it is relaxing and having a great time when sitting on a table. On top of it all, its head can bob up and down, which is important for such a cute robot.

Oh yeah, and it's also kind of a play on letters (oshwa - oshawatt).
body pic
Open Source

Hooray! Oshawatt is here and it has brought all of its filez for everyone to enjoy! The original CAD files were made in Autodesk Inventor 2013, but just in case you don't have access to that program, we have included 3d views of the major assemblies here on this webpage. There are also .eps files available, which can be opened in Inkscape. We also include files that already have the pieces layed out for the laser cutter. The size is 24"x12", with a block of room left over. This robot is designed for 1/8th inch hardboard (mdf) material. There's no kerf adjustments in the CAD (because with wood you can glue and sand it), so just as a heads up if you are trying to cut this in acrylic. Enjoy! :)

License
Oshawatt v1

These are all the CAD files for the Oshawatt v1 robot. Included are the Autodesk Inventor 2013 files, as well as .eps files for all of the pieces. There are also 3d views of the major assemblies available online at http://robobrrd.com/oshawatt. The .eps files have the pieces in the proper dimensions, which can be seen when opening in Inkscape (or similar) and selecting the path to see the length. Be sure to read the other included .txt files for additional information.

Designed by Erin Kennedy / RobotGrrl for RoboBrrd.com.

CERN OPEN HARDWARE LICENSE v1.1
http://www.ohwr.org/

All text above must be included in any redistribution

Download Oshawatt v1!
Go for it!

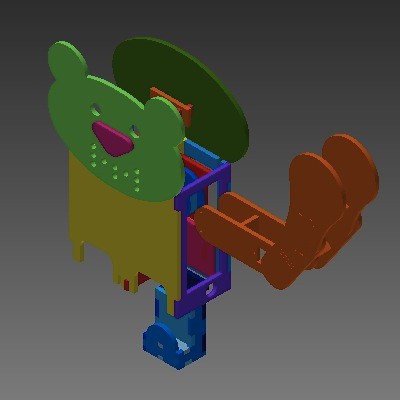
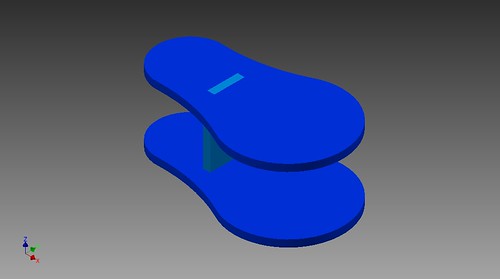
This robot is open source, which totally means go ahead and make one! The pieces are pretty easy to cut out on paper and cardboard too, if you don't have access to a laser cutter. Actually, a cardboard one would probably work a lot better because it will be quite lighter! ;) There's no electronics in this design. I was thinking that Oshawatt could have all of its electronics in a bag sort of like a back pack. I was thinking of going with an Arduino and the servo controller from Adafruit (thanks Adafruit!). As for sensors, probably some force-sensing resistors placed on its ears and arms would be cool. Shoutout to SpikenzieLabs who has laser cut out Oshawatt, thanks!

One of the reasons why this is open source is because I don't have the money to get all the parts for it, like all the servos, leds, and sensors. Meh. So it would be better off here so that maybe hopefully someone will create it and I'll be able to see it work, which would just be really nice to see the creation up and running! :D If you do happen to make an Oshawatt, it would be great if you could take some pics and show em to me on Google+! :D

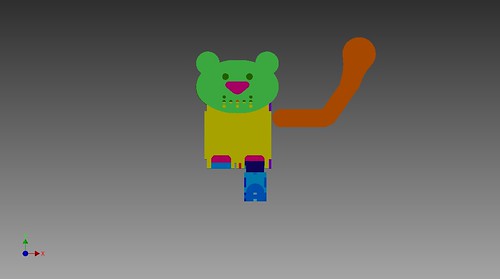
Like all cool robots, Oshawatt does have a personality that I imagine for its character. It's the type of robot that wants a lot of sensory feedback, so it will be waving its arms like crazy, and then humans will interact with it, and then it won't know what to do. When that happens, it becomes sort of shy and starts to bob its head and animate its mouth expressions. Of course, its eyes are an overall indicator of its mood (assuming they are rgb leds). Oh yeah, in case you didn't guess, its favourite dance would definitely be YMCA, though it has trouble with the 'M' letter sometimes.

Wavin' Arms

Arm Assembly CAD

About Arm

The arm is the main movement point of this robot. It will be the one that will capture the attention the most. Some of the fun challenges (like any robot arm) will be to move the first link while having the second link remain pointing in the same direction. Same for the third link. The idea was to create a simple arm, that balances simplicity with the ability to work. Meaning, it's not the best way to create an arm, but it uses micro servos which are quite inexpensive.
arm-assembled3
First Link

The first arm link is mounted back to the body via piano wire. The mount for the arm itself is able to swing backwards and forwards a few degrees. The servo for controlling the second arm link is located at the bottom of the arm. The strut for this link is as long as the servo mounted behind the front material. This is so the back plate is able to rest gently on the back of the servo.
arm-first3
Second Link

The second arm link is mounted to the first link via hotglue on the servo horn attached to the back of the front plate. It will be interesting to see how well this servo will be able to work. The strut for this link is quite long in order to have the back plate rest on the back plate of the first link. As such, the second arm link is the one that protrudes the most.
arm-second3
Third Link

The third arm link is the paw. It is mounted to the second link via hotglue on the servo horn attached to the back of the front plate. This servo should be able to work well as the paw is not that large (so it isn't very heavy). The strut for this link is supposed to allow the back plate to rest on the back of the second arm link's servo.
arm-third3
Building It

For each arm link, there is a front plate, back plate, and strut. For the third arm link, the front and back plate are the same. Attaching the servo can be done with the two mounting screws, and also a line of hotglue around the perimeter of the servo will make sure it remains in place. Mounting the first arm link will be an experiment with different lengths of piano wire. It would be best to test that the first arm link can lift the second arm before mounting the third arm.

All of the necessary pieces are in arm-drawing.eps. Some files to look at in Inventor would be arm-assembled.iam for the complete arm assembly. This refers to sub-assemblies for each arm: arm-first.iam, arm-second.iam, and arm-third.iam. Remember to look at all the other files that have the arm prefix for the related parts.
arm-assembled

Body

Body Assembly CAD

About Body

The body houses the scotch yoke mechanism for the head to bob up and down, and also provides the arm and legs a place to be mounted to swing around. It is a rectangular shape, and should prove to be quite strong. The sides have holes in them for the legs to be mounted through. There are notches at the bottom of the front and back plate of the body for pieces that will be able to have the other side of the leg mounted through. This is similar at the top as well, except there are four notches only in the back plate. These are for clip pieces that will be able to mount the arm through it. The back plate has large rectangle holes in it for the arm servo plate to swing though. The swinging of the arm will be limited by the piano wire hitting the side faces of the body.

Below are two 'hollow' views of the body, so you can see what is on the different layers.
body
Body Assembly CAD - Hollow 1

Body Assembly CAD - Hollow 2

Building It

When building the body, make sure to install the swinging arms and legs first. This way you won't accidentally forget to do so. Then, add on the scotch yoke mechanism (and test to make sure it works). After that, you can add on the sides to the body, and finally the front plate.

All of the necessary pieces are in body-drawing.eps. Looking at body.iam will give a good idea of all the pieces involved. There are numerous pieces for the body, so it is best to check out all of the files that begin with the body prefix.
body-hollow1-3

Immobile Swinging Leg

Leg CAD

About Leg

The leg contains several pieces and somewhat resembles a Lego minifig leg. All of the pieces are interlocking and will be quite strong when glued together. Although it may be strong, it is definitely not meant for serious robot bodies standing on it. This is why there are the little knobs on the side, so it can poke through some supporting holes, and swing freely. The idea is that when picked up, the legs can 'pretend' that they are standing, and when set down on a table, it will look like the robot is 'sitting'.
foot-assembled
Building It!

The leg is kind of straight forward to build. All of the pieces will interlock, and adding wood glue to secure the pieces will make it extremely strong. All of the necessary pieces are in leg-drawing.eps. Also, looking at leg-assembled.iam can help give a good way to understand what pieces go where. Individually, all the pieces will have the foot prefix.
foot-assembled3

Oshawatt's Head

Head CAD

About Oshawatt's Head

Oshawatt's head is pretty big, and it is designed to be able to bob up and down with the scotch yoke mechanism. The eyes can fit some 10mm leds, or piranna leds (like RoboBrrd's eyes). The nose is used to cover up the holes needed to attach the struts through the scotch yoke mechanism. The struts are quite long, as the two plates for the face needed to have clearance over the body. Also on the front face are quite a few holes for 5mm leds. The holes are designed in a pattern to allow a lot of expressions, such as happy, sad, surprised, and fangs. It would be best to light these leds with a colour other than green or red, which may give the impression that the robot is happy / angry respectively. Also, for decoration there is supposed to be a cfl lightbulb shape in the middle of the back plate that can be illuminated with leds. This is why Oshawatt ends with -watt! :P
head-assembled
Building It!

The head only has a few pieces, so hopefully nothing too catastrophic will happen. The notch on the strut is for attaching to the top part of the scotch yoke piece. By putting the two struts in opposite directions, it should give it a bit more strength. It might be a good idea to attach the nose on first so that way it will for sure be flush with the face.

All of the necessary pieces are in head-drawing.eps. Looking at head-assembled.iam will give a good idea of all the pieces involved. And you can see all the related pieces with the head prefix.
head-assembled2

Robots Rock

Thx!

Thanks for taking the time to check out Oshawatt. I hope you can make one and let me know how it goes ^_^ All I ask for in return is just a thanks and a smile.

Any donations to fund some more of my crazy character robot experiments would be much appreciated!

~Oshawatt waves its hands at you~