This tutorial will help you get started with attaching your Arduino to a Google+ Hangout Extension. We will be creating a way to turn on and off an LED through a web app interface. We have tried to make it as understanding as possible, however it is quite advanced and in-depth, so you may have to do some extra research on Google and customizations to get it going.
In this tutorial you will learn about:
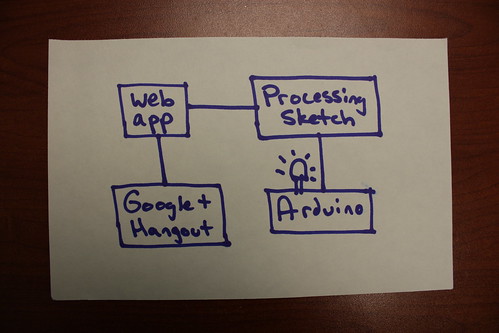
To get started with this tutorial, first be sure to watch the overview video so you will get an understanding of what is involved in the project. Here is also a very basic overview of the different aspects involved:
Download the code from Github. Look at and explore the code. You don't have to do anything with it yet, but this will get you familiar with what you will be using.
We have to set up an ec2 instance for hosting our web app. There are many tutorials out there already for getting set up and running with an ec2 instance. Here are the ones that we followed to get ours working:
For the following steps, the in-depth code is covered within this video. It's about 30mins long, so be sure to take breaks throughout.
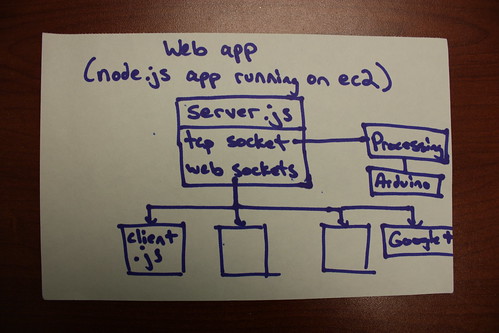
Now it is time to get started with the web app design. The code for this step is all within /webapp.
Here is an image that gives the basics of the web app.
The variables that you have to replace with your own are in index.html and server.js, which are noted with a 'TODO' comment. Here are the ones you will be replacing:
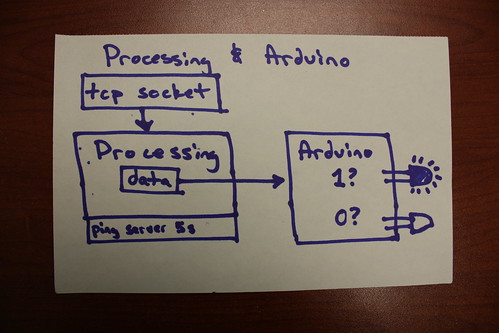
The Processing sketch is the messenger between the server and Arduino. The code for this step is all within /socketconn.
Here is an image that gives the basics of the Processing sketch.
The variables that you have to replace with your own are in socketconn.pde, which are also noted with a 'TODO' comment. Here are the ones you will be replacing:
Huzzah! Here is where we turn on the LED! The code for this step is all within /arduinoconn.
There is nothing to be replaced in the Arduino sketch (unless you want a different pin for your LED), so just upload it to your Arduino and you're good to go!
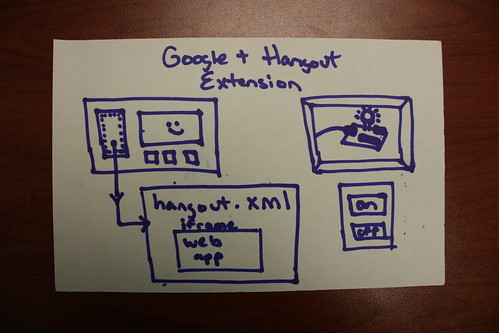
Here is where we will be adding our web app to the hangout extension. The code for this step is all within /hangoutxml.
Although there is not a lot happening inside of the Google+ Hangout, here is an image:
The variables that you have to replace with your own are in arduinoexample.html and arduinoexample.xml, which are noted with a 'TODO' comment. Here are the ones you will be replacing:
From here, you can test it out and run it!
If you had trouble with any of the steps, be sure to watch the in depth code video from above. We go through it there, and it should help. If not, post a question on our forum!

 Store
Store Robots
 Learn
Learn Community