Wavy Text Token Using Autodesk Inventor


In this tutorial we will be creating a wavy text token. Along the way we will learn about text-embossing, manipulating sketches, and extruding tricks. This is a good exercise to play around with Autodesk Inventor and create something interesting to look at.

Why does this matter? Going further, you can use the skills learned in creating curved robot pieces, interesting looking structures, additional customization, and other ideas your imagination comes up with!

All that you will need is: Autodesk Inventor, a mouse with a right/left click (middle is handy for panning the view), and a special word or phrase.

Wavy Text Token

Here is the completed file to download, if you are interested in looking at it.

Download Example Inventor File

The Waves


First part is to create the sketch of the waves. This will then be extruded upwards to create the main body of the piece.

Start out by creating a new part, and making a new sketch (plane doesn't really matter).

1. Here's an example of a sketch with the waves all parameterized. This means that all of the lines and arcs have dimensions that you can edit. Going further, you could also add constraints to them. In this tutorial, we won't be using many dimensions, but feel free to use some in your work in progress.

2. Start out by making a horizontal construction line, and create two arcs.

3. Press offset, select the two arcs, and slide your mouse so it will resemble something like this.

4. Select all the arcs and press copy. For the base point, choose the left-most point at the end of the arc. Use your mouse to move the copy to the other end, linking it to the right-most point.

5. Add a mini-arc to the ends of the arcs to complete the shape. Do the same for the other end.

5 (and a half). Select one of the arcs, right click it, and press Close Loop. Go through clicking each next arc, pressing OK for the alerts, until the loop is closed.

If you don't close the loop, what happens is that you can't extrude the shape (because it is open). Sometimes I've had experiences where you can't even see the opening by zooming in very far, but using Close Loop has fixed it.

6. Exit sketch mode by pressing the green checkmark button on the right side. Now press extrusion, and select the profile of the wavy shape to extrude it.

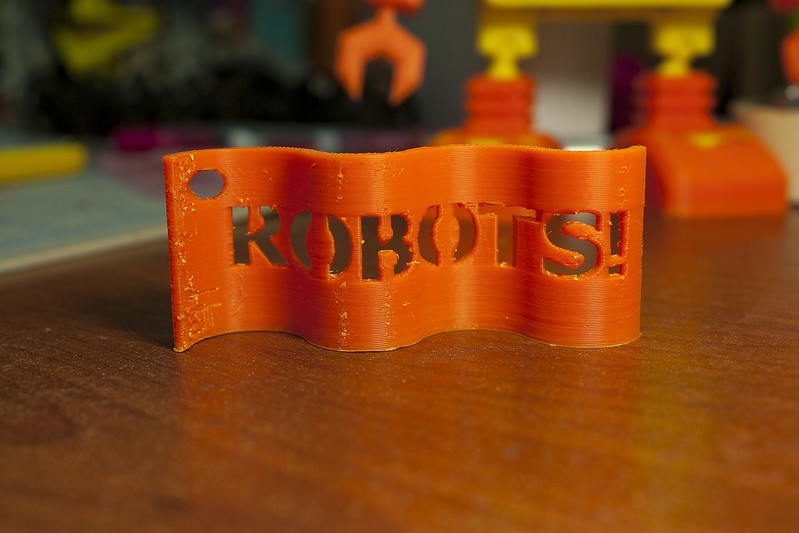
Now that we know how to create a shape and extrude it, it's time to work on embossing the text.

Embossed Text


Now we will add on some text to the waves and make it follow the form by being an emboss. By following the form, the text will 'move' with the waves, rather than directly protrude from it. It's a subtle difference, but it shows through the feel of the text when printed.

7. Start out by creating a new plane that is an offset from an original plane.

8. For the offset plane, choose the XY plane (or whichever one goes along all the waves).

9. Set the offset distance to some value. In our case, 5mm. Feel free to play around with this number, and see what different effects you can make.

10. Press 'create a new sketch', and select the new plane from the sidebar.

11. Add some new text, and try different fonts, sizes, and positioning.

12. Exit out of sketch mode and press emboss. Choose the text as the profile, and emboss outwards.

13. Here's what it should look like so far.

As mentioned above, check out the way the text follows the waves. As you orbit around the model, you will be able to see this much better.

If this is the effect you were looking for- then you have reached the final point. After this next step of the keyring hole, we will be working on making the text go through the entire wave shape for an interesting look.

Keyring


Let's add a hole so that we can make it into a keyring. This will be a minor addition to our existing sketch.

14. Press the plus button next to the Emboss feature. Then right click on the sketch and press 'Share Sketch'.

15. Inside the sketch, make a circle. A dimension of 7mm is pretty good.

16. Exit out of the sketch, and extrude the circle. Make sure it goes backwards and is set to 'cut'.

17. Here's what it will look like.

There are ways that you can improve the strength of this keyring hole, if you are interested. One would be to add an 'outer' ring, and extrude it.

The real fun officially begins now- next up is creating the hollow text! ;)

Hollow Text


In this part we will be making the text hollow and adding in rectangle shapes to support the 'floating' parts of some of the letters (like the R, O, B).

It will require some tinkering along the way, so being patient with this and experimenting is a good strategy to follow.

18. Double click on the previous emboss, and change it to be a subtraction and going backwards. Press the green check mark, and now you will see the cut out of the text.

19. Open the sketch with our text in it. In the background (not on the part), right click. You should see a menu that will have Slice Graphics on it. Clicking it will make us see everything in our sketch better.

20. Create some rectangles in the sketch that extend from the floating parts of the letters to the piece.

21. Exit out of sketch mode and extrude the rectangle on the first wave. Click on the little arrow button to reveal a menu where you select To selected face/point.

22. Select the back face of that particular section of the curve.

23. Here's what it will look like (notice it goes through to the back).

24. Now it's time to extrude the next shapes on the next wave. For these ones, make the extrude symmetric.

25. This is what it will look like. If you orbit around, you'll notice the extrude going through to the other side as well. (Don't worry- we'll be fixing this in a later step).

26. Now for the next shapes, extrude and press the arrow button to select To selected face/point.

27. Select the back face.

28. Here's what it will look like (notice the extrudes go to the back face).

29. At this point, here's what it should look like.

Now let's clean up these protuding extrusions!

Removing Extras


In order to remove the extras, what we will do is create a rectangle around the wavy shape, extrude them upwards, but set it as cut.

This is an example of using some (what I like to call) trickery to achieve your imagined output. Sometimes you have to go about things differently to get what you were looking for.

30. Open up the first sketch (the base of the waves) and add lines to it, as seen in picture above.

31. Finish the line at the other end of the shape.

32. Create another line...

33. ...and finish it at the other side.

34. This is what it will look like. It doesn't have to be exact, but as long as the lines are touching the arcs at a point- then it will be fine.

35. Exit out of the sketch, and in the sidebar right click on the sketch and press Share sketch.

36. Create an extrusion that goes upwards. Make it the same height as the waves and set it to cut.

37. Orbit the viewpoint to the other side, and do the same thing.

38. Here's what it will look like when done.

You see? A little trick that can be used for 'subtracting' shapes, making for a flush side.

Double-Check Tweaks


It's always a good idea to double check things, especially if you want them printed. In this case, we actually missed something, so now we will fix it!

39. Yikes, an error that we have to fix. These extrusions do not reach the back side of the wave.

40. Press extrude, and extrude those rectangles outwards.

41. In the sidebar, move the newest extrusion to be before the cut extrusion.

42. As you can see, it looks much better now.

43. There's a similar issue on the other side as well. Extrude the rectangles outwards.

44. Move the new extrusion to be before the cut extrusion.

45. This side also looks better now.

46. Seeing from above, there are no extrusions sticking out, so that is a good sign!

It might sound crazy, but double checking (even triple) can save you a bunch of time and frustration in the end. I usually find it helps to go through a quick check with a clear mind, especially after not looking at the model for 15 mins. It works to catch mistakes and save filament.

Final Stage


Let's add some colour to this model, just to add a little snazziness. We will also be sure to save the file as a stl for printing.

47. Press the colour dropper button at the very top, and select the entire model (dashed outline will appear).

48. Choose which colour you like (bright orange!).

49. Here's what it will look like in the end!

50. Save your model (you probably did this already).

51. Now we need to save it as a .STL- so press the big I in the top left, save as, then save copy as.

52. Make sure you select .stl!

53. Everything is done now! w00t w00t!

Complete


If you made it through this tutorial and created something that was wavy and interesting- mega congrats! Now all you have to do is 3D print it.

Our aim of this tutorial was to help you learn about text-embossing, manipulating sketches, and extruding tricks. Hopefully this has incremented your skills, to go on further and create new models.

Share what you have made with us on Twitter, Google+, or Facebook! It will be neat (and very rewarding to us) to see what you have made and learned.

If you have any questions, feel free to ask on the forum.


"I just learned how to create a wavy text piece! #RoboBrrd"
RoboBrrd Learn I just learned how to create a wavy text piece! #RoboBrrd