In order for RoboBrrd to not destroy itself using its own servos, we need to set the minimum and maximum positions for the left wing, right wing, and beak. The reason why is because if either of the wings go up or down too far, then the servo is 'fighting' against its own geometry. The servo is trying to move the wing, when there is no where else for it to move. The same goes for the beak servo, it can only open and close to a certain position.
Sounds complicated though, right? Well, we developed an app that will help you with this task called RoboBrrd Dashboard!
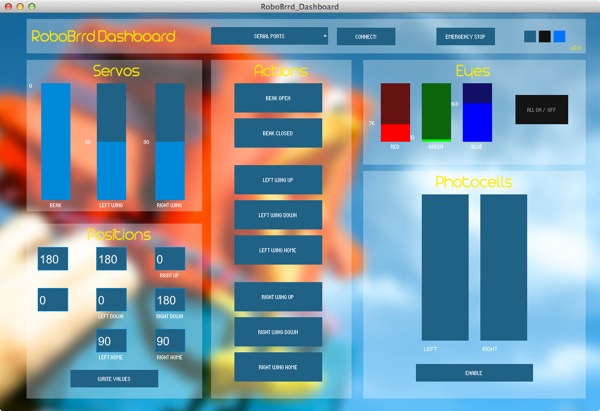
With the RoboBrrd Dashboard, you can use sliders to adjust the servo positions. You can also set the various position values, and test them out with the action buttons. There is also buttons for the eyes to turn them on and off (with the option of independent control), and a bar graph display of the photocells.
It runs on Mac, Windows, and Linux. Please download it over here!
In order to have RoboBrrd listening to respond to the app, it has to be running some certain code. Don't worry, this will be easy on your part!
1. Open the Arduino IDE (if you don't already have it open)
2. Go to File > Examples > RoboBrrd > Boilerplate
3. Remember to select the proper board and port settings as we discussed in the programming section
4. Upload the code to your RoboBrrd
That's it! As long as the upload was successful (no angry red text), then this is all that you needed to do for this step.
Onwards!
Now it is time to use the fancy app to control our RoboBrrd! You can play around with the app, below are just some steps that you can follow if you want to.
When you have all of the values set, it is time to write them to RoboBrrd's memory! You can do this by pressing the button in the Positions section that says Write Values.
After approximately 3 seconds, the values being written to RoboBrrd's memory is complete. Now you are done! You can disconnect and unplug / replug in RoboBrrd to see how it automatically starts up with the set positions.
What if you wanted to make an adjustment to RoboBrrd's home position without launching the app? Would it be possible to do something similar with Arduino code using the RoboBrrd library?
The answer is YES! :)
Here are some methods that might be of interest to you, from the RoboBrrd library:
        void setServoHome(uint8_t ser, uint16_t pos);
        void setServoDefaults(uint8_t ser, uint16_t p1, uint16_t p2, uint16_t p3);
        void setServoDefaultP2(uint8_t ser, uint16_t pos);
        void setServoDefaultP3(uint8_t ser, uint16_t pos);
Let's walk through how on earth we can use these funky functions to do what we want. The first thing that we notice is that for all of them, there is a parameter called ser. No, not like sir, this is just refering to the servo number that it needs!
RoboBrrd is able to have four servos, and they are enumerated like this:
Next up is the position. This can range from 0 to 180. It is the same number that you see next to the servo sliders in RoboBrrd Dashboard.
Now, there are some that refer to position 1, position 2, or position 3. What does this mean?
For different servos, it means different things. Here is the breakdown:
How does this all come together? Here is some example usage!
        // sets the rotational servo home to 90 degrees (the middle)
        robobrrd.setServoHome(robobrrd.ROTATION_SERVO, 90);


        // sets the beak servo positions- 30 for home, 60 for open, and 0 for closed
        robobrrd.setServoDefaults(robobrrd.BEAK_SERVO, 30, 60, 0);


        // sets the up position on the right wing servo
        robobrrd.setServoDefaultP2(robobrrd.RWING_SERVO, 140);


        // sets the down position on the right wing servo
        robobrrd.setServoDefaultP3(robobrrd.RWING_SERVO, 50);
The ideal place for calling these methods in your sketch would be at the very end of void setup().
Try it out! Right now, add some of the above lines to your RoboBrrd Boilerplate and upload it. Though, it is important to note that this will overwrite your previously saved values. But, you can always re-write them again at your leisure!


